Hi there and welcome to the STAGEFLOW manual!
StageFlow helps you lay out your content on a stage. This manual will walk you through the process and show you what options you have available along the way
I know you have better things to do than read page after page of technical mumbo jumbo, so here’s an index to help you quickly find the topic you want to know more about. Also, I added pictures in between all them word thingies.
Table of Contents
Using Input Maps
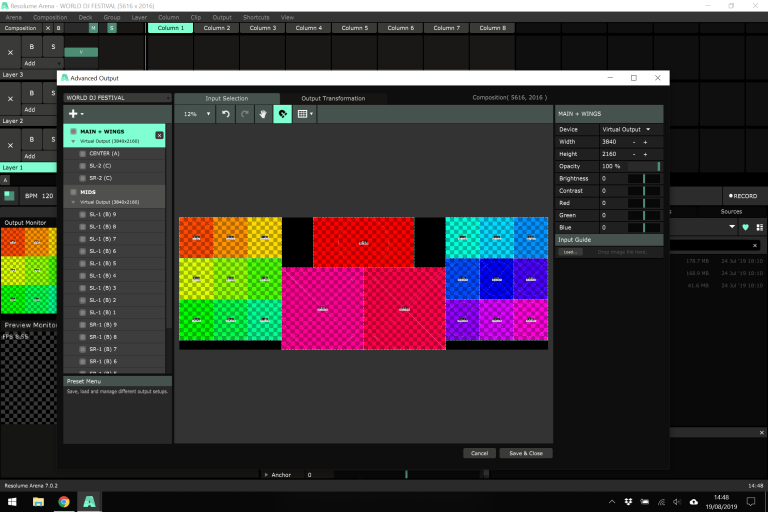
First, you will create your input map in Resolume Arena. The only thing that matters here is that if you want to use a slice individually, it should live in its own spot in the input map. Even when it overlaps with other slices on the real stage! You’ll make the overlap later in StageFlow.
The input map can be as compact as you can make it. This will help save on processing power. There is no need to take negative space into account or to make slices bigger or smaller. It helps to keep the layout symmetrical, so you can easily use mirror effects later on, but it’s not required.
Once you’ve created the input map, select all the slices to see how big your comp should be. Change your comp size to this resolution and reposition the slices to fit the new canvas size. Then save your output preset and close the Advanced Output.
Recreating the Stage
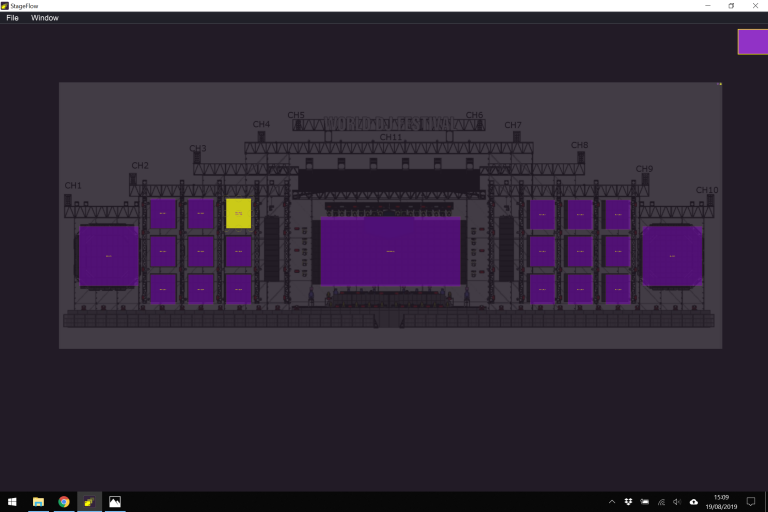
In StageFlow, select File > New. StageFlow will load the input map you have active in Resolume.
Now recreate the stage. Just drag each slice to where it actually lives on the stage. You can lasso multiple slices and drag them at the same time.
You can go as large as you want, you don’t have to worry about processing power or resolution. You can add as much negative space to recreate the looks you want. If screens overlap, like a DJ booth in front of a larger back wall, you can just place them on top of each other.
Background
If you have a previz image or photo of the stage, you can load that as a background by drag and dropping it on the stage. This image will serve as a guide. There’s no need to spend a lot of time making it pixel perfect. Keep it roughly centered and make it match the size of your slices and you’ll be good. You can lock the background in the top right when satisfied.
Navigating
You can zoom in and out by mouse scrolling / 3 finger swiping. You can pan the stage by holding down spacebar and dragging.
Snapping

Slices will snap to each other’s edges and to the center. You can use different edges or corners for snapping by dragging from different parts of the slice.
When close together, slices will also snap to other slices, using a third slice as a point of symmetry. This also works across the center of the stage.
You can temporarily disable snapping by holding down CTRL.
Scaling
You can scale slices by dragging in one of the eight corners. You can use Shift to scale proportionally, and Alt to scale from the center. This is useful to adjust for LED screens that have a different pixel pitch, or to fake different offsets in depth.
Rotating
You can rotate slices to match the orientation they have on the stage. By holding down Shift, you can snap the rotation to 15º degree increments.
Hide Screens
If you have any extra screens containing slices that you don’t want to be part of the stage, use the little flyout in the top right to hit the cogwheel next to the Stage. It will fold out to show all available screens and you can toggle off any screens you don’t want to see.
Creating Looks
Once you are satisfied with how the stage is layed out, you can start creating Looks.
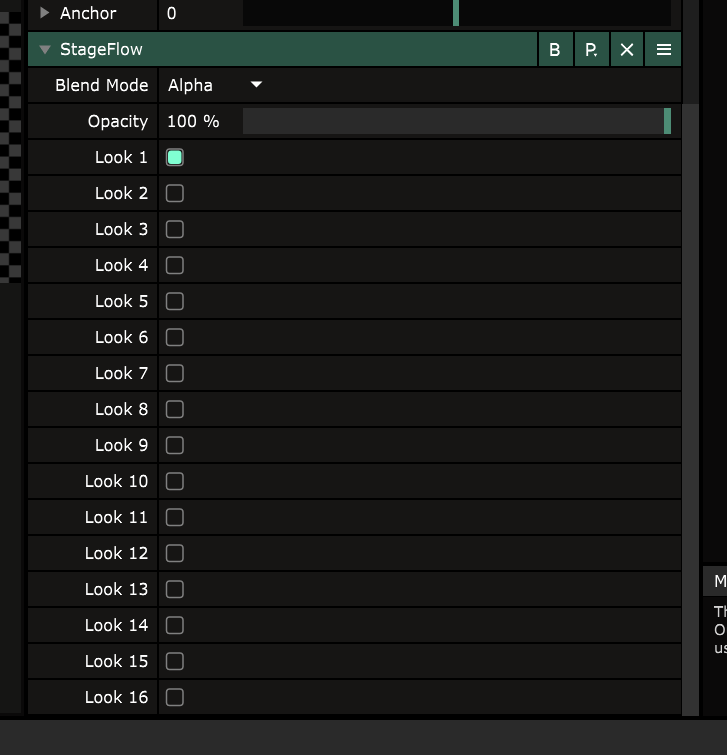
StageFlow saves every step automatically, so just use the little flyout to switch from Stage to Look 1. This will lock all the slices and let you focus on laying out your content.
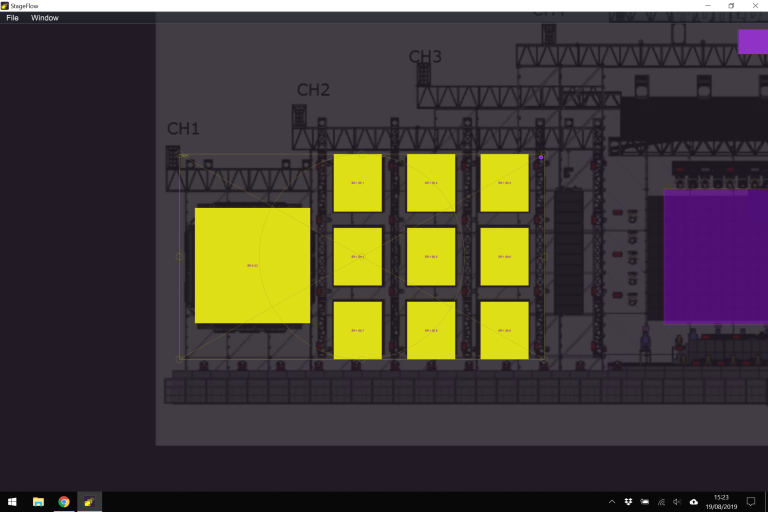
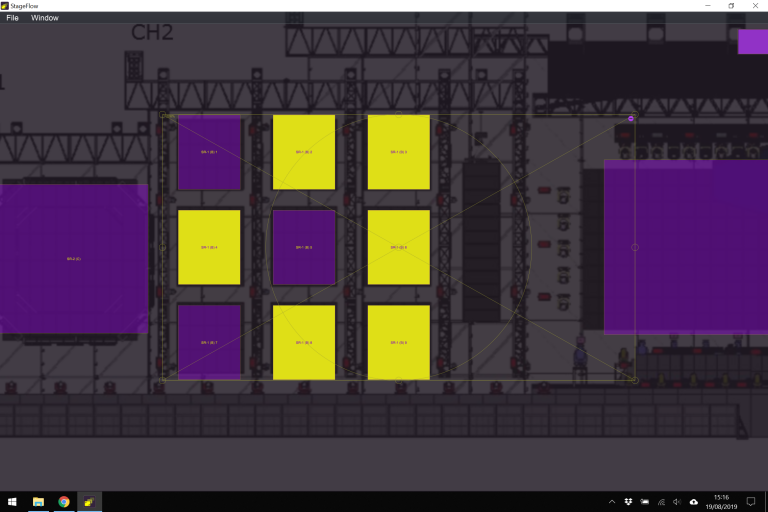
Lasso all the slices you want to be part of Look 1 and hit the little plus button underneath the flyout. StageFlow now does a bunch of math and then positions a 16:9 widget to perfectly cover all the slices you had selected.
This widget is called a Focal, because it is where your viewers will focus when you use this Look. A Focal takes into account all the overlaps, negative space and any scaling you may have on your slices, and later on it will tell Resolume to only render the visible pixels.
Adjusting Size
By default, StageFlow assumes your content will be 1920×1080. If you are using a different resolution, you can hit the cogwheel next to the Look and fill out the resolution you need. StageFlow will adjust the aspect ratio of the Focal to match the new resolution.
Applying Looks
You apply a Look by using the StageFlow effect in Resolume.
Drag it from the list of effects to the clip, layer or group you want to use it on. It will apply the first Look automatically.
Boom. Your content is remapped to the input map, based on the Look you just created in the application.
Multiple Looks
Of course, one Look would be boring, so you can create a total of 16 Looks.
In StageFlow, you select Look 2 by clicking the right arrow in the flyout. Then you simply repeat the process with a different set of slices, creating a Focal for them with the plus button.
You can have as many Focals as you want in a Look. So you can have the same content play on different parts of the stage at the same time.
Adjusting Focals
Focals can be scaled and dragged just like regular slices. This is huge.
By default, StageFlow will center your Focal directly over the slices that are part of it. But you can drag and scale the Focal to be off center. This way you can have only the left side of your content show up on the wings on the left side of the stage and the right side on the wings on the right side.
StageFlow will include all the slices that are completely covered by a focal. Included slices will turn yellow. If you don’t want a particular slice to be part of a Focal, you can just click it and it will be ignored for that Focal.
In the top left of the Focal, you can see how much the content will be scaled up or down. Of course it’s best to keep this under 100%, but there’s no limits. If you want to break the rules, you do you. You’re a loner, Dottie. A rebel.
By holding down Shift while scaling the Focal, you’re sure that your content won’t get distorted. Of course you can scale the Focal to any size and ratio you want. StageFlow lets you know your content will be out of proportion by showing two percentage, for the x and y axes.
Combining Looks
For the first Look, it’s best to select all the slices to create a continuous look that covers the whole stage. Of course, if your stage is stupid wide, this first Look should already consist of multiple Focals, but the idea is that your first Looks are screen filling and cover the whole stage.
Then each subsequent Look will have smaller and smaller Focals for the different areas of the stage you want to highlight, down to individual screens or slices.
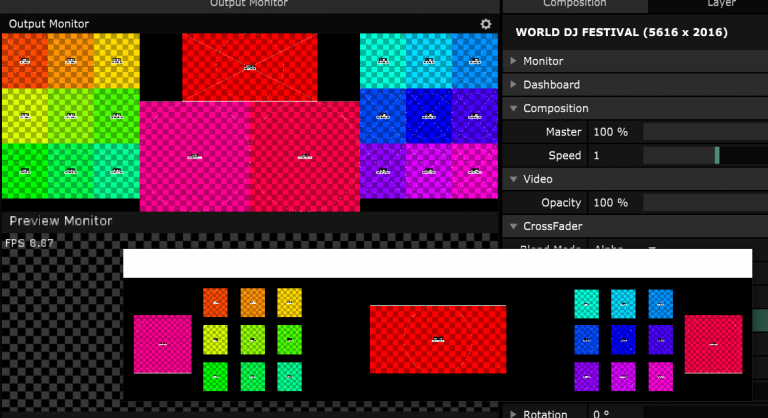
In Resolume, you can toggle each Look on and off. You can have more than one Look enabled, so you can combine them to create new combinations during show. When a slice is used in more than one Look, it will display the pixels for the highest numbered one.
By making the first Looks screen filling, you can enable two or more Looks to create ‘picture-in-picture’ combinations, where the first lower Look makes sure the whole stage is filled and the second higher Look makes sure your lyrics are still legible on the center screen.
Focal Options
By right clicking a Focal, you get access to some additional scaling options.
Distribution
This will let you change how StageFlow distributes your content over the slices that make up your Focal.
Perspective is the default mode. In this mode, StageFlow will calculate where all the slices are, take into account negative space, scaling and overlap, and remap your content so it appears ‘perspective correct’ on the real stage.
By selecting Duplicate, you essentially get the same behavior as lice Transform. It positions your content to fill each and every slice in the Look, from the center. It’s offered as an option to make it easier to combine perspective and duplicated Looks in one effect.
Mirror
Mirror lets you mirror your Focal horizontally, vertically or both.
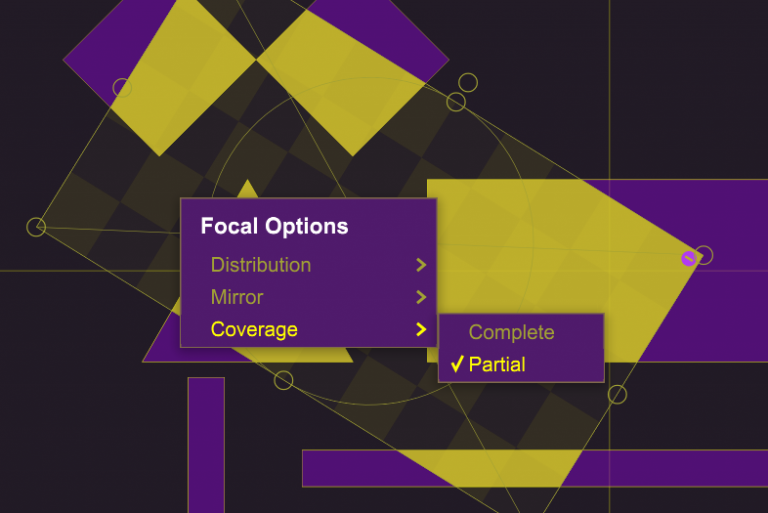
Coverage
This is a powerful setting. By default, StageFlow doesn’t include a slice in a Focal unless it covers it completely, or is completely contained by it. By switching to partial coverage, you can include slices that are only partially covered by a Focal, to create all sorts of combined looks.
Slices
StageFlow is designed to work as visually as possible, but if you’re so inclined, the flyout in the top right has a list of all the Focals in your look, and each cane be toggled open to reveal a list of all the slices that are covered by a Look. Here you can then toggle them on and off as well.
Preview
If you’d like to preview how your content actually looks on the real stage, you can enable Syphon/Spout output in Resolume (Output > Texture Sharing (Syphon/Spout)).
In StageFlow, you can then enable a preview via Window > Preview. This will open a resizable window that shows your content exactly where it will end up on the real stage.
This window stays on top of other windows, so if you like, you can keep it in view while you are using Resolume.
Saving
StageFlow automatically saves every change that you make and updates it immediately in the plugin. So you can keep StageFlow open to add or adjust Looks, even during show.
If you need to prepare a show for someone else or are working with multiple recurring stages, you can change the file you’re working on using File > Save As… and File > Load
Relink
In the File menu, you will also find the Relink option. Relinking will let you link your StageFlow layout and Looks to a different Resolume setup file. You would do this when the input or output map has changed so much that you need to use a different version than the one you started with. Relinking will link StageFlow to the new output file in Resolume, while keeping all the layouts and looks in tact.
It does this by first comparing the slices in your old setup with the slices in the new setup, and trying to find matches. It checks for several things like name, size and position, both in the input and the output map. If it finds a unique match, it will relink that slice and use the new input map position for any focals containing it.
If it can’t find any matches, because new slices were added, or the changes are just too severe, it will create new slices that you can then reposition manually. When using the Relink function, your Focals and layout will always stay untouched.